# Vendor API v3
This document describes the usage of the anybill vendor REST API v3.
# Environments
anybill provides two public environments: Production and Staging. While the Production environment is used for all live systems, the staging environment is for testing new features, testing the integration with POS software providers or integration testing. All new features will be released first to the Staging environment.
# Staging
ℹ️ This environment is for integration testing.
Base URL: https://vendor.stg.anybill.de/
SwaggerUI (opens new window)
OpenApi-Specification v3 (JSON) (opens new window)
ReDoc (opens new window)
# Production
ℹ️ This environment is for production use.
Base URL: https://vendor.anybill.de/
SwaggerUI (opens new window)
OpenApi-Specification v3 (JSON) (opens new window)
ReDoc (opens new window)
# Authentication
# Basics
Communication with the anybill cloud platform is only possible after prior authentication.
anybill uses OAuth 2.0 or OpenId Access Tokens for authentication. The identities are managed in an Azure Active Directory B2C. To get an access token you need a client id and a service account with username and password.
- The client ID is assigned by anybill once per POS system manufacturer.
- Username and password of the service account are assigned by anybill to the merchant.
# Scopes
The functional areas of the API are secured by scopes. An access token with the requested scopes must be used for the respective functional area. The following scopes currently exist:
- https://ad.anybill.de/vendor/bill (opens new window)
- https://ad.anybill.de/vendor/customer (opens new window)
- https://ad.anybill.de/vendor/store (opens new window)
- https://ad.anybill.de/vendor/user (opens new window)
# Retrieving an Access Token
To retrieve an access token, an HTTP POST request with the following data must be
sent to our OAuth 2.0 endpoint.
URL
https://adanybill.b2clogin.com/ad.anybill.de/oauth2/v2.0/token?p=b2c_1_ropc_vendor (opens new window)
Header
Content-Type: application/x-www-form-urlencoded
Query Parameters
{“p” : “b2c_1_ropc_vendor”}
Body
{
    grant_type: password
    username: <service account username>
    password: <service account password>
    client_id: <client id of the POS system manufacturer>
    scope: https://ad.anybill.de/vendor/bill offline_access
    response_type: token
}
If authentication is successful, the server outputs the access token as a response in the following format:
{
    "access_token": "*****",
    "token_type": "Bearer",
    "expires_in": "86400",
    "refresh_token": "*****"
}
For every communication with endpoints of the anybill API the access token must be specified in the header:
Authorization: Bearer <access_token>
# Retrieving a Refresh Token
The access token can be updated as follows:
URL
https://adanybill.b2clogin.com/ad.anybill.de/oauth2/v2.0/token?p=b2c_1_ropc_vendor (opens new window)
Header
Content-Type: application/x-www-form-urlencoded
Query Parameters
{“p” : “b2c_1_ropc_vendor”}
Body
{
    refresh_token: <refresh token>
    grant_type: refresh_token
    client_id: <client id of the POS system manufacturer>
    scope: https://ad.anybill.de/vendor/bill offline_access
    response_type: token
}
If the update is successful, the server outputs the access token as a response in the following format:
{
   "access_token": "*****",
   "token_type": "Bearer",
   "expires_in": "86400",
   "refresh_token": "*****",
   “refresh_token_expires_in”: “*****”,
}
# Bill Endpoints
# Endpoints
The receipt controller offers two routes:
- GET
/v3/bill/url: Get QR code in advance for a receipt. - POST
/v3/bill: Send receipt to anybill. - DELETE
/v3/bill/{billId}: Cancel a receipt based on the billId. - POST
/v3/bill/{billId}/printed: Adds a printed timestamp to the receipt.
# Detailed Endpoint Description
Staging Environment: SwaggerUI (opens new window)
Production Environment: SwaggerUI (opens new window)
# Request
The store ID must be sent in the body of the request. The BuyerInformation are optional and not necessary.
POST /v3/bill
{
  "storeId": "3QT1su7Wtl",
  ... // see Swagger
}
# Response
The response returns a json object with an url from which the QR code can be generated.
{
   "type": "url",
   "url": "url to receipt",
   "billId": "Id of the receipt"
}
The POST /v3/bill-route can be used to add following types of receipts.
- Anonymous Receipts:
- This is the case if the POS not provide a user identifier as a value in
userIdentification.externalId- e.g. via QR code scan of a loyalty card of the consumer.
Example:{ "url": "https://getmy.anybill.de/{billId}" }
- This is the case if the POS not provide a user identifier as a value in
- User Receipts:
- This is the case if the POS provides a value in
userIdentification.externalId, e.g. the loyalty/crm identifier scanned at the POS. Here, anybill can use this information to e.g. assign the receipt automatically to the consumer's app account, use it for analytics, insights and actions in Purchase Intelligence or many other use cases.
- This is the case if the POS provides a value in
If the user identification object or all its property are null, the receipt will be treated as anonymous.
# Response
The /v3/bill endpoint returns different response objects.
- When no
userIdentification.externalIdhas been provided in the request:
// UrlBillResponseDto
{
   "type": "url",
   "url": "url to receipt",
   "billId": "Id of the receipt"
}
- When a value in
userIdentification.externalIdhas been provided in the request and the receipt was matched with an external user (e.g. receipt was assigned to a user account to make it visible in the merchant's app) - without requiring a QR code.:
// ExternalIdResponseDto
{
   "type": "externalId",
   "isAssigned": true,
   "billId": "Id of the receipt"
}
💡 isAssigned will always be true if type is externalId. If userIdentification.externalId has been defined, and no match could be made, the response is of type url.
# User identification
If a receipt with a link to a known consumer should be added, the property userIdentification.externalId must be set with the identifier value.
- The
externalIdof the consumer is an identifier from a marchant's system like CRM (customer number), Loyalty. The maximum length is 256 characters.
# Transparent user creation via externalId
Historically, anybill required merchants to first create an anybill user via the Partner Platform API, in order to link an externalId-Identifier to it later.
After popular demand, this requirement has been removed:
If the provided userIdentification.externalId is not yet known to anybill, anybill internally creates an anonymous anybill user automatically and the receipt is assigned to it.
No pre-registration or creation of an internal anybil user is required anymore.
On subsequent receipts with the same userIdentification.externalId value, the existing user is reused.
The same userIdentification.externalId can later be passed to the Partner Platform API token endpoint to obtain an SDK token for that user.
WARNING
The "Transparent user creation via externalId" - flow has to be manually enabled per merchant on the anybill side. If it is relevant for your integration, please contact dev@anybill.de or your anybill contact person.
Deprecated useridentification fields
The previously available userIdentification.userId (anybill user id) and userIdentification.loyaltyCardBarcode fields are deprecated and will be removed in a future revision. Use userIdentification.externalId for all new integrations.
# Self-generated Receipt Id
The Vendor API optionally offers the possibility that the POS system generates a Receipt ID (UUID) independently, prior to sending the receipt data.
WARNING
The "Self-generated Receipt Id" - feature has to be manually enabled per merchant on the anybill side. If it is relevant for your integration, please contact dev@anybill.de or your anybill contact person.
If a self-generated Receipt Id already exists
If the self-generated receipt UUID already exists in the anybill system, a HTTP 400 error is returned with the following error message:
{
    "errors": [
        {
            "message": "Bill with Id 5e952ea6-167d-4001-95d9-a759204c2943 already exists",
            "code": "billId-alreadyExists",
            "extensions": {}
        }
    ],
    "type": "https://tools.ietf.org/html/rfc7231#section-6.5.1",
    "title": "One or more business logic errors occurred.",
    "status": 400,
    "detail": null,
    "instance": "/v3/bill",
    "extensions": {
        "traceId": "00-62c5389aa64965de30dcf0c4313e60c1-cc61c9200d008c1b-00"
    }
}
# BillDTO object
Our BillDTO object bundles all receipt information, which are based on the DFKA standard with anybill specific extensions. As root object of the receipt it links to five different categories of data:
- Cash register* Information about the cash register.
- Head* Head data of the receipt.
- Data* Receipt data.
- Security* Data to secure the receipt via TSE.
- Misc Optional additional data.
To guarantee that only valid information is added to the anybill system, a variety of validation rules is executed. If the validation of the receipt object fails a response with a HTTP status code of 400 is returned with a description of validation errors in the body of the request.
Most of the rules are set in the open api specification, but some rules are far too complex in order to be able to be represented in the open api specification.
# Id
This is null by default to let anybill's backend create a unique UUID for each receipt.
The Receipt Id can be set by the POS under two situations:
- Set an an Id that has already been created in advance via the GET
/v3/bill/urlendpoint (recommended form a UX perspective) - You have the Self-generated Receipt ID feature enabled.
# Cash Register
Contains data about the cash register. Currently only the serial number of the cash register is needed.
# Head
Contains common data of the head of a receipt. E.g. invoice number, date, seller or buyer information.
Important rules:
- If
deliveryPeriodStartis setdeliveryPeriodEndmust be set too or vice versa. datemust be after 1900-01-01- The
sellerobject overrides the internal information set in the anybill system. E.g. if some information about the store has temporarily changed that is not yet updated in the anybill system this can be used to override the defaults.
# Data
Contains the most important information for the buyer. The items he has bought and the value of the shopping cart. Important rules:
currencymust be a valid three digit ISO 4217 (opens new window) code.- Each
vatAmountmust be unique by the percentage.
Important rules paymentTypes:
- If
foreignAmountis setforeignCurrencymust be set and vice versa. foreignCurrencymust be a valid three digit ISO 4217 (opens new window) code.- The anybill extension must not be null.
- Only the matching
paymentDetailsfor thetypeset in the anybill extension will be read.
Important rules lines:
- The anybill extension must not be null.
- DefaultLine:
- Each
vatAmountmust be unique by the percentage. - Each
vatAmountset for a discount in the anybill extensions must have a correspondingvatAmountset in the default line. - A maximum of 5
reminders can be set perwarrantyin theitem warrantyEndmust be afterwarrantyStart.warrantyEndandwarrantyStartmust be afte 1900-01-01.
- Each
Important rules for data extensions:
- If
barcodeis setbarcodeTypemust be set and vice versa. - Each
vatAmountmust be unique by the percentage. - Each discount must have a unique
id
# Security
The security object contains information about the technical security equipment required in the different countries. With the help of the Type attribute, the appropriate TSE can be transmitted depending on the country.
Globale important rules:
tsemust be set unlesstseFailureis set totruein the security extensions.tsemust be set unlesstseRequiredis set tofalsein the security extensions.
Important rules TSE (Germany):
timestampStart,timestampEndandfirstOrdermust be after 1900-01-01.
TSE (Germany)
{
   "serialNumber": "623323B6C170DF2200...8F3A78E5BA7C4BA60B",
   "signatureAlgorithm": "ecdsa-plain-SHA384",
   "logTimeFormat": "unixTime",
   "certificate": "LS0tLS...S0tCg ==",
   "timestampStart": "2021-11-29T15:00:57.22976+01:00",
   "timestampEnd": "2021-11-29T15:00:57.22976+01:00",
   "firstOrder": "2021-11-29T15:00:57.22976+01:00",
   "transactionNumber": 50,
   "signatureNumber": 121,
   "processData": "Kassenbeleg-V1",
   "processType": "Beleg^42.31_16.26_0.00_0.00_0.00^58.57:Bar:Visa",
   "signature": "AjEGS...dhRitb",
   "extension:anybill": {
      "posInspectionQrData": "_R1-AT1_4690F01D01_68_2021-10-04T13:54:19_4,00_0,00_0,00_0,00_0,00_jVWJIf9wOCDo544VtmI7dQ==_15BE7FD2_eUwHgkS8AGE=_GkWvZVamt1RKsUBSbGACKgcfhX7iNiRq4iQgZ8E4CUPHStNAnC6k7IPA5cG4OFlyAh0GsbSRanKBUfy0PsyVqg==",
      "additionalLegalText": "Additional legal text",
      "additionalTseData": {
         "firstName": {
               "displayName": "display value",
               "value": "Value"
         },
         "secondName": {
               "displayName": "display value",
               "value": "Value"
         }
      }
   }
}
RKSV (Austria)
{
   "type": "rksv",
   "signature": "AjEGS...dhRitb",
   "serialNumber": "Tpzx/mesZGSu/XO6ZaKZO/bk87HKejMaU2VCDoAgmp4=",
   "transactionNumber": 1459,
   "signatureNumber": 3833,
   "posInspectionQrData": "_R1-AT1_4690F01D01_68_2021-10-04T13:54:19_4,00_0,00_0,00_0,00_0,00_jVWJIf9wOCDo544VtmI7dQ==_15BE7FD2_eUwHgkS8AGE=_GkWvZVamt1RKsUBSbGACKgcfhX7iNiRq4iQgZ8E4CUPHStNAnC6k7IPA5cG4OFlyAh0GsbSRanKBUfy0PsyVqg==",
   "additionalLegalText": "Additional legal text",
   "additionalData": {
      "firstName": {
         "displayName": "display value",
         "value": "Value"
      },
      "secondName": {
         "displayName": "display value",
         "value": "Value"
      }
   }
}
# Misc
Optional additional data.
Important rules misc extensions:
- If
returnBarcodeTypeis setreturnBarcodemust be set and vice versa.
# Description of possible values
For better understanding some values are descibed below.
Values for enumerations like QuantityMeasure, PriceModifier or PaymentType can be the integer value or the string equivalent, whereas integers are prefered. The descriptions always show the integer value and the string equivalent/meaning of the value.
# Lines
There are three types of lines. The type of the line is determined with the type-discriminator in the extension of the line. Possible discriminators:
defaultor no value (null) for default linestextfor text only linesdiscountfor discount line
# Default line
The default line represents an item or service that was sold. You can add useful information in the additionalText or even add warranty information and let the user be notified before the warranty ends.
# Text line
The text line can be used to add text in between other lines. This can be as easy as a product group seperation or further useful information.
# Discount line
The discount line displays a discount that is applied to the whole receipt. Therefore the values must have a negative balance.
# Possible QuantityMeasure values:
The quantity measure describes the type of quantity of the line item. For bananas, whose price is often measured by weight, you would choose 1 (kilogram) and for t-shirts that are sold per unit you would choose 0 (count).
| Name | Value |
|---|---|
| Count | 0 |
| Kilogram | 1 |
| Lbs | 2 |
| Meters | 3 |
| Inches | 4 |
| Liter | 5 |
| CubicMeters | 6 |
| SquareMeters | 7 |
| KilowattHour | 8 |
Example:
qantityMeasure: "Count"
# PaymentTypes
The payment type describes the type of payment used in the payment type information object. The type used should be specified further with the name-property. E.g. for a payment with visa the payment type should be 3 (credit card) and name should be "Visa". The name should be human readable and will be displayed for the user.
# Possible PaymentType values:
| Name | Value |
|---|---|
| Miscellaneous | 0 |
| Cash | 1 |
| DirectDebit | 2 |
| CreditCard (Deprecated) | 3 |
| OnlinePayment | 4 |
| GiftCard | 5 |
| BankTransfer | 6 |
| Check | 7 |
| LoyaltyCard | 8 |
| Girocard (Deprecated) | 9 |
| Elv | 10 |
| Maestro (Deprecated) | 11 |
| VisaElectron (Deprecated) | 12 |
| CardPayment | 12 |
Example:
type: "Cash"
For every payment type, except for miscellaneous, additional details can be provided in the paymentDetails-property. E.g. for the cash payment type the CashPaymentDetails-object can be optionally used. Any details given, that do not match the correct payment type will be ignored.
Check payment details
{
  "name": "Check",
  "amount": 112.90,
  "foreignAmount": null,
  "foreignCurrency": null,
  "extension:anybill": {
     "type": "Check",
     "paymentDetails": {
        "drawee": "The person in whose favour the cheque",
        "payee": "Person who receives payment",
        "dateOfIssue": "Date and Time in iso 8601",
        "drawer": "The one who has written out the cheque",
        "sortCode": "",
        "accountNumber": ""
     }
  }
}
BankTransfer payment details
{
  "name": "Bank XY Transfer",
  "amount": 112.90,
  "foreignAmount": null,
  "foreignCurrency": null,
  "extension:anybill": {
     "type": "BankTransfer",
     "paymentDetails": {
        "purposeOfUsage": "Some usage description",
        "iban": "DE 1234",
        "bic": "1342",
        "accountHolderName": "MS Pos GmbH",
        "accountNumber": "1234",
        "bankName": "Bank Name",
        "bankAddress": "Some Address",
        "sortCode": "1234",
        "routingNumber": "abcd",
        "ifscCode": "1234",
        "routingCode": "abcd",
        "terminalId": "1234",
        "terminalDateTime": null,
        "terminalTime": "12:37:04",
        "terminalDate": "20.07.2020",
        "traceNumber": "4321",
        "cardPan": "The primary account number",
        "cardSequenceNumber": 1234,
        "cardExpiryDate": "12/27"
    }
  }
}
Cash payment details
{
  "name": "Cash",
  "amount": 112.90,
  "foreignAmount": null,
  "foreignCurrency": null,
  "extension:anybill": {
     "type": "Cash",
     "paymentDetails": {
        "amountGiven": 120.00,
        "amountReturned": 17.10
    }
  }
}
CardPayment payment details (CardPayment, Girocard, Maestro, VisaElectron, CreditCard)
{
  "name": "Visa",
  "amount": 112.90,
  "foreignAmount": null,
  "foreignCurrency": null,
  "extension:anybill": {
     "type": "CardPayment",
     "paymentDetails": {
        "cardNumber": "123456",
        "bankName": "Some Bank",
        "terminalId": "1234",
        "terminalDateTime": null,
        "terminalTime": "12:37:04",
        "terminalDate": "20.07.2020",
        "traceNumber": "4321",
        "cardPan": "The primary account number",
        "cardSequenceNumber": 1234,
        "cardExpiryDate": "12/27",
    }
  }
}
DirectDebit payment details (DirectDebit, Elv)
{
  "name": "Elv",
  "amount": 112.90,
  "foreignAmount": null,
  "foreignCurrency": null,
  "extension:anybill": {
     "type": "Elv",
     "paymentDetails": {
        "sepaCreditorId": "",
        "sepaMandateReference": "",
        "cardNumber": "",
        "bankName": "",
        "terminalId": "1234",
        "terminalDateTime": null,
        "terminalTime": "12:37:04",
        "terminalDate": "20.07.2020",
        "traceNumber": "4321",
        "cardPan": "The primary account number",
        "cardSequenceNumber": 1234,
        "cardExpiryDate": "12/27",
    }
  }
}
GiftCard payment details
{
  "name": "Geschenkkarte",
  "amount": 112.90,
  "foreignAmount": null,
  "foreignCurrency": null,
  "extension:anybill": {
     "type": "GiftCard",
     "paymentDetails": {
        "initialBalance": 200.00,
        "remainingBalance": 87.10,
        "dateOfExpiry": "Date and Time in iso 8601"
    }
  }
}
LoyaltyCard payment details
{
  "name": "Shop XY Card",
  "amount": 112.90,
  "foreignAmount": null,
  "foreignCurrency": null,
  "extension:anybill": {
     "type": "LoyaltyCard",
     "paymentDetails": {
        "name": "MS-Pos Loyalty Card",
        "accountNumber": "21341234",
        "pointsUsed": 11290.0,
        "pointsLeft": 1293403.0,
        "pointsGained": 32.0
    }
  }
}
OnlinePayment payment details
{
  "name": "Paypal",
  "amount": 112.90,
  "foreignAmount": null,
  "foreignCurrency": null,
  "extension:anybill": {
     "type": "OnlinePayment",
     "paymentDetails": {
        "senderAccountName": "CSymeoudakis@mspos.net",
        "recipientAccountName": "yourmail@anybill.de",
        "transactionId": "1293403"
    }
  }
}
# Terminal customer receipt
The Terminal text attribute is available on bill.misc.additonalReceipts and have to be filled with the payment information text which is provided by the terminal.
This is an example of the terminal text:
Terminal customer receipt example
"additionalReceipts": [
    {
        "contentType": "text/plain",
        "content": "Terminal-ID :   61400710
        TA-Nr 000584    BNr 0062

             Kartenzahlung
            Visa kontaktlos
                  Visa

        EUR 10,00

        PAN     ############2515
        Karte 0
        EMV-AID   A0000000031010
        VU-Nr             123456
        Genehmigungs-Nr   123456
        Datum 19.02.20 15:38 Uhr
        EMV-Daten
        0000000000/0000///"
    }
],
# Terminal merchant receipt
The Terminal text attribute is available on bill.misc.additonalReceipts and have to be filled with the payment information text which is provided by the terminal.
This is an example of the terminal text:
Terminal merchant receipt example
"additionalReceipts": [
   ...,
    {
        "type": "VendorReceipt",
        "contentType": "text/plain",
        "content": "ICAgICAgLUgtw4QtTi1ELUwtRS1SLUItRS1MLUUtRy1cblxuICAgICAgICAgICAgSm95YHMgU2hvcFxuICAgICAgICAgIEFtIFN0ZWluZmVscyAxXG4gICAgICAgICAgIDY1NjE4IFNlbHRlcnNcblxuVGVybWluYWwtSUQgOiAgICAgICAgICAgICAgNTQwNjE1ODNcblRBLU5yIDA3MDk0MiAgICAgICAgICAgICAgIEJOciA0MzAzXG5cbiAgICAgICAgICAgS2FydGVuemFobHVuZ1xuICAgICAgICAgICAga29udGFrdGxvc1xuICAgICAgICAgICAgTUFTVEVSQ0FSRFxuXG4gICAgRVVSIDExLDU0XG5cblBBTiAgICAgICAgICAgICAgICAjIyMjIyMjIyMjIyMzMjg3XG5LYXJ0ZSAwXG5FTVYtQUlEICAgICAgICAgICAgICBBMDAwMDAwMDA0MTAxMFxuVlUtTnIgICAgICAgICAgICAgICAgICAgICA4MDM2MjQ0NTBcbkFJRFBhcmEgICAgICAgICAgICAgICAgICAwMTAwMDAwMDAyXG5HZW5laG1pZ3VuZ3MtTnIgICAgICAgICAgICAgIDA3MDMxMVxuRGF0dW0gMTMuMDQuMjIgICAgICAgICAgICAyMDoxMyBVaHJcbkVNVi1EYXRlblxuMDAwMDAwODAwMS9BODAwLzAwMDAwMDAwMDAvRjQ1MDg0ODBcbjBDL0Y0NTA4NDgwMEMvM0YwMDAyLy8vMjE3OEEwOTQvODBcblxuWmFobHVuZyBlcmZvbGd0XG5cbj09PT09PT09PT09PT09PT09PT09PT09PT09PT09PT09PT09XG5BUy1Qcm9jLUNvZGUgPSAwMCAwNzUgMDBcbkNhcHQuLVJlZi49IDAyNjBcbkFJRDU5OiAxNDI5OTFcbj09PT09PT09PT09PT09PT09PT09PT09PT09PT09PT09PT09XG5cbiAgICAgIEJJVFRFIEJFTEVHIEFVRkJFV0FIUkVOXG5cbg=="
    }
],
# Possible CurrencyCode values:
To specify the currency, the 3-digit ISO 4217 (opens new window) standard is used. Any currency codes that do not match the standard will result in a invalid response.
Example 1:
currency: "EUR"
Example 2:
foreignCurrency: "USD"
# Discounts
A discount can either be set to each line item individually or to the whole receipt.
# Discount for individual line items
To discount a single line item fill the discounts array property in the extension of the line. If multiple discounts are applied to one line item, the sequence number can be set to give the consumer the ability to understand how the final price is composed.
Example with multiple discounts
{
  "sequenceNumber": 1,
  "fullAmountInclVatBeforeDiscounts": 799.9,
  "discounts": [
    {
      "sequenceNumber": 0,
      "discountId": "LAPTOP21",
      "vatAmounts": [
        {
          "percentage": 19,
          "inclVat": 100,
          "exclVat": 84.03362,
          "vat": 15.96638
        }
      ],
      "fullAmountInclVat": -100
    },
    {
      "sequenceNumber": 1,
      "discountId": "LAPTOP10",
      "vatAmounts": [
        {
          "percentage": 19,
          "inclVat": 69.99,
          "exclVat": 58.81512,
          "vat": 11.17488
        }
      ],
      "fullAmountInclVat": -69.99
    }
  ],
  ...
}
To further describe a single line discount a definition can be added in the extension of the data of the receipt. To reference a discount the same set the discountId of the applied discount to the id of the definition. The values won't be shown to the customer and can therefore be any value. If the same discount is applied to multiple line items only one reference should be used. If a discount is referenced multiple times the vatAmounts and fullAmountInclVat of the definition in the data extension is supposed to be filled.
{
  "discounts": [
    {
      "id": "LAPTOP21",
      "name": "100 € off on 2 laptops",
      "additionalText": "This discount only applies if at least 2 laptops of the same type are bought.",
      "value": 100,
      "type": "Monetary",
      "vatAmounts": [
        {
          "percentage": 19,
          "inclVat": 100,
          "exclVat": 84.03362,
          "vat": 15.96638
        }
      ],
      "fullAmountInclVat": 100
    },
    {
      "id": "LAPTOP10",
      "name": "10 % on laptops",
      "additionalText": "This discount applies to all laptops bought. Can be combined with other discounts.",
      "value": 10,
      "type": "Percentage",
      "vatAmounts": [
        {
          "percentage": 19,
          "inclVat": 69.99,
          "exclVat": 58.81512,
          "vat": 11.17488
        }
      ],
      "fullAmountInclVat": 69.99
    }
  ]
}
# Discount for the whole receipt
To add a discount that is applied to the whole receipt the discount line can be used. Multiple discount lines can be used for different discounts.
To enhance the information from which line items the discount is made up the relatedLines property can be used. Either use it on the vatAmounts to link the to the line item by the sequenceNumber or set all lines on the root.
Example:
{
  "text": "Wochenendrabatt 3 %",
  "additionalText": "3 % Rabatt am Wochenende",
  "vatAmounts": [
    {
      "percentage": 7,
      "inclVat": 0.09,
      "exclVat": 0.08411,
      "vat": 0.00589,
      "relatedLines": [
        0
      ]
    },
    {
      "percentage": 19,
      "inclVat": 0.08,
      "exclVat": 0.06723,
      "vat": 0.01277,
      "relatedLines": [
        2
      ]
    }
  ],
  "fullAmountInclVat": 0.17,
  "relatedLines": null,
  "extension:anybill": {
    "sequenceNumber": 3,
    "type": "discount"
  },
  ...
}
# Returning a line item:
If you want to return a bills line item the following steps are necessary:
- Given an existing receipt
Awith a line itemA1. - Create a new receipt
Bwith an extra line itemB1which represents the returned line itemA1. - Set the property
ReturnBarcodeReferenceof line itemB1to the value of propertyReturnBarcodeof receiptA. - Save receipt
B.
A line item is then displayed as "returned" in receipt B.
Example
Bill A:
{
  "storeId": "8192538C-CC23-488B-B35B-0F16BE1B8F43",
  "bill": {
     "head": {
        "date": "2020-06-20T13:00:00+00:00",
        ...
     },
     "data": {
        "lines": [
           {
              "text": "A1",
              "quantity": 1,
              "fullAmountInclVat": 1.00,
              ...
           },
           {
              "text": "A2",
              "quantity": 3,
              ...
           }
        ]
     },
     "misc": {
        "extension:anybill": {
           "returnBarcode": "123",
           ...
        },
        ...
     },
     ...
   }
}
Bill B:
{
  "storeId": "8192538C-CC23-488B-B35B-0F16BE1B8F43",
   "bill": {
      "head": {
         "date": "2020-06-20T15:00:00+00:00",
         ...
      },
      "data": {
         "lines": [
            {
               "text": "B1",
               "quantity": 1,
               "fullAmountInclVat": -1.00,
               "extension:anybill": {
                  "returnBarcodeReference": "123", // see returnBarcode of Receipt A
               },
               ...
            }
         ]
      },
      ...
   }
}
# Custom sections
Custom sections allow you to insert your own attributes between the defined areas in order to individualize the receipt and display the necessary information.
A custom section can be inserted either before or after a defined area, contains a title and a list of data which are displayed in the given order by the sequenceNumber.
The title will not be displayed on pdf. May be used in digital display formats.
The customSectionId can be used if it should be needed again later via the SDK. Must be unique across all customSections.
# Areas
The receipt is generally divided into the following areas:
HeadLinesPaymentDetailsVatDetailsAdditionalDataBuyerFooterTextTseInformationAfterSalesCouponsHospitalityInformation
A receipt with the marked sections can be downloaded here.
# Types
Currently, data of type text, keyValue, barcode or qrCode can be added to a custom section.
text
{
   "sequenceNumber": 0,
   "customSectionId": "NameId",
   "type": "text",
   "text": "text message",
   "alignment": "Left|Center|Right"
}
keyValue
{
   "sequenceNumber": 1,
   "customSectionId": "NameId",
   "type": "keyValue",
   "key": "LoyaltyCard number:",
   "value": "123456789"
}
barcode
{
   "sequenceNumber": 0,
   "customSectionId": "NameId",
   "type": "barcode",
   "barcodeType": "Barcode|Code128ABarcode|Code128BBarcode|Code128CBarcode",
   "value": "Value of the barcode"
}
qrCode
{
   "sequenceNumber": 0,
   "customSectionId": "NameId",
   "type": "qrCode",
   "value": "Value of the qrCode"
}
# Custom section example
"customSections": [
   {
      "position": "Before",
      "section": "Head",
      "title": "Title of the custom head section",
      "data": [
            {
               "sequenceNumber": 0,
               "type": "Text",
               "text": "Before Head text"
            },
            {
               "sequenceNumber": 1,
               "type": "KeyValue",
               "key": "LoyaltyCard number:",
               "value": "123456789"
            }
      ]
   },
   {
      "position": "After",
      "section": "VatAmounts",
      "title": "Title of the custom vatAmounts section",
      "data": [
            {
               "sequenceNumber": 0,
               "type": "barcode",
               "barcodeType": "Code128ABarcode",
               "value": "Value of the barcode"
            },
            {
               "sequenceNumber": 1,
               "type": "qrCode",
               "value": "Value of the qrCode"
            }
      ]
   }
]
# Print Buffer Format Guide
1. Introduction The PrintBuffer format is a specialized text format used to generate receipts with specific formatting. This guide explains how to create correctly formatted PrintBuffer content that will render properly in the receipt system.
The PrintBuffer is transmitted within the additionalReceipts as BasicReceipt. By setting isPrimaryReceipt, the PrintBuffer will be used for PDF generation.
"additionalReceipts": [
    {
        "type": "BasicReceipt",
        "contentType": "text/plain",
        "isPrimaryReceipt": true,
        "isPrintBuffer": true,
        "content": "XHh7Q0VOVEVSfSBBQ01FIFNUT1JFClx4e0NFTlRFUn0gMTIzIE1haW4gU3RyZWV0Clx4e0NFTlRFUn0gQW55dG93biwgQU4gMTIzNDUKXHh7Q0VOVEVSfSBUZWw6IDU1NS0xMjMtNDU2NwpceHtDRU5URVJ9IC0tLS0tLS0tLS0tLS0tLS0tLS0tLS0tLS0tLS0tLQpDYXNoaWVyOiBKb2huICAgICAgICAgICAgIFJlZ2lzdGVyOiAwMQpEYXRlOiAyMDI1LTAzLTExICAgICAgICAgIFRpbWU6IDE1OjMwCgpSZWNlaXB0OiAjQTEyMzQ1Clx4e0NFTlRFUn0gLS0tLS0tLS0tLS0tLS0tLS0tLS0tLS0tLS0tLS0tCjEgeCBQcm9kdWN0IEEgICAgICAgICAgICAgICAgICAgJDEwLjAwIAoyIHggUHJvZHVjdCBCICAgICAgICAgICAgICAgICAgICQxNS45MAozIHggUHJvZHVjdCBDICAgICAgICAgICAgICAgICAgICQyMC45NwoKXHh7UklHSFR9IFN1YnRvdGFsOiAgICAgICAgICAgICAgICAgICAkNDYuODcKXHh7UklHSFR9IFRheCAoMTAlKTogICAgICAgICAgICAgICAgICAkNC42OQpceHtSSUdIVH0gVE9UQUw6ICAgICAgICAgICAgICAgICAgICAgICQ1MS41NgpceHtDRU5URVJ9IC0tLS0tLS0tLS0tLS0tLS0tLS0tLS0tLS0tLS0tLQpceHtDRU5URVJ9IFRoYW5rIHlvdSBmb3Igc2hvcHBpbmcgd2l0aCB1cyEKXHh7UFRSX0JDU19RUkNPREV9IEExMjM0NS0yMDI1MDMxMQoKXHh7Q0VOVEVSfSBQb3dlcmVkIGJ5IEFueWJpbGw="
    }
],
2. Basic Syntax
Each control character must be placed on its own line and begins with the \x{ prefix and ends with the } suffix. For example:
\x{CENTER}
After a control character, the following line of text will be formatted according to that control character until the line ends. It’s only possible to use one control character per line.
3. Text Formatting Controls Use these control characters to change how text appears:
| Control Character | Effect |
|---|---|
\x{BOLD} | Makes text bold |
\x{DHIGH} | Makes text double height |
\x{DWIDE} | Makes text double width |
\x{DWIDEDHIGH} | Makes text both double height and width |
\x{SMALL} | Makes text smaller than normal |
4. Text Alignment Controls Use these control characters to change text alignment:
| Control Character | Effect |
|---|---|
\x{LEFT} | Aligns text to the left (default) |
\x{CENTER} | Centers text on the line |
\x{RIGHT} | Aligns text to the right |
\x{INVERSE} | Inverts the colors for the text (white text on black background) |
5. Barcode Controls Use these control characters to create different types of barcodes:
| Control Character | Effect |
|---|---|
\x{PTR_BCS_CODE39} | Creates a Code 39 barcode |
\x{PTR_BCS_CODE128A} | Creates a Code 128A barcode |
\x{PTR_BCS_CODE128B} | Creates a Code 128B barcode |
\x{PTR_BCS_CODE128C} | Creates a Code 128C barcode |
\x{PTR_BCS_QRCODE} | Creates a QR code |
6. QR Code Formatting For QR codes, additional control characters specify positioning and text placement:
| Control Character | Effect |
|---|---|
\x{PTR_BC_CENTER} | Centers the QR code (default) |
\x{PTR_BC_LEFT} | Left-aligns the QR code |
\x{PTR_BC_RIGHT} | Right-aligns the QR code |
\x{PTR_BC_TEXT_NONE} | Hides text with the QR code |
\x{PTR_BC_TEXT_ABOVE} | Shows text above the QR code |
\x{PTR_BC_TEXT_BELOW} | Shows text below the QR code |
7. Format Guidelines
Each receipt line has a maximum character limit:
- Maximum normal characters per line: 42
- Maximum small characters per line: 56
For alignment control:
- Left-aligned text is the default.
- Center and right-aligned text will be positioned based on the full line width.
- Text width varies based on the font - monospaced text works best for column alignment.
For barcodes and QR codes:
- Place the barcode/QR code content on the line after the control character.
- For QR codes, place positioning and text display preferences on separate lines.
8. Example Receipt Here’s an example of a basic receipt in PrintBuffer format:
\x{CENTER} ACME STORE
\x{CENTER} 123 Main Street
\x{CENTER} Anytown, AN 12345
\x{CENTER} Tel: 555-123-4567
\x{CENTER} ------------------------------
Cashier: John             Register: 01
Date: 2025-03-11          Time: 15:30

Receipt: #A12345
\x{CENTER} ------------------------------
1 x Product A                   $10.00
2 x Product B                   $15.90
3 x Product C                   $20.97

\x{RIGHT} Subtotal:                   $46.87
\x{RIGHT} Tax (10%):                  $4.69
\x{RIGHT} TOTAL:                      $51.56
\x{CENTER} ------------------------------
\x{CENTER} Thank you for shopping with us!

\x{PTR_BCS_QRCODE} A12345-20250311

\x{CENTER} Powered by Anybill
Usage of the print buffer
If this option will be used it is necessary to talk with us. There are configuration settings needed for every customer on the anybill side.
# Request
The billId must be sent with the request as a query parameter.
# Response
tip The response returns a statusCode 204 if the receipt could be cancelled or 404 if the receipt couldn't be found.
# Store Endpoints
These endpoints are used to manage the stores of a vendor. This can also be done on the anybill Partner Portal.
The most important usecase of these endpoints is to enable larger companies to automate the process of syncing store details.
- GET
/v3/store - POST
/v3/store - GET
/v3/store/{id} - DELETE
/v3/store/{id} - GET
/v3/store/search
# Detailed Endpoint Description
Staging Environment: SwaggerUI (opens new window)
Production Environment: SwaggerUI (opens new window)
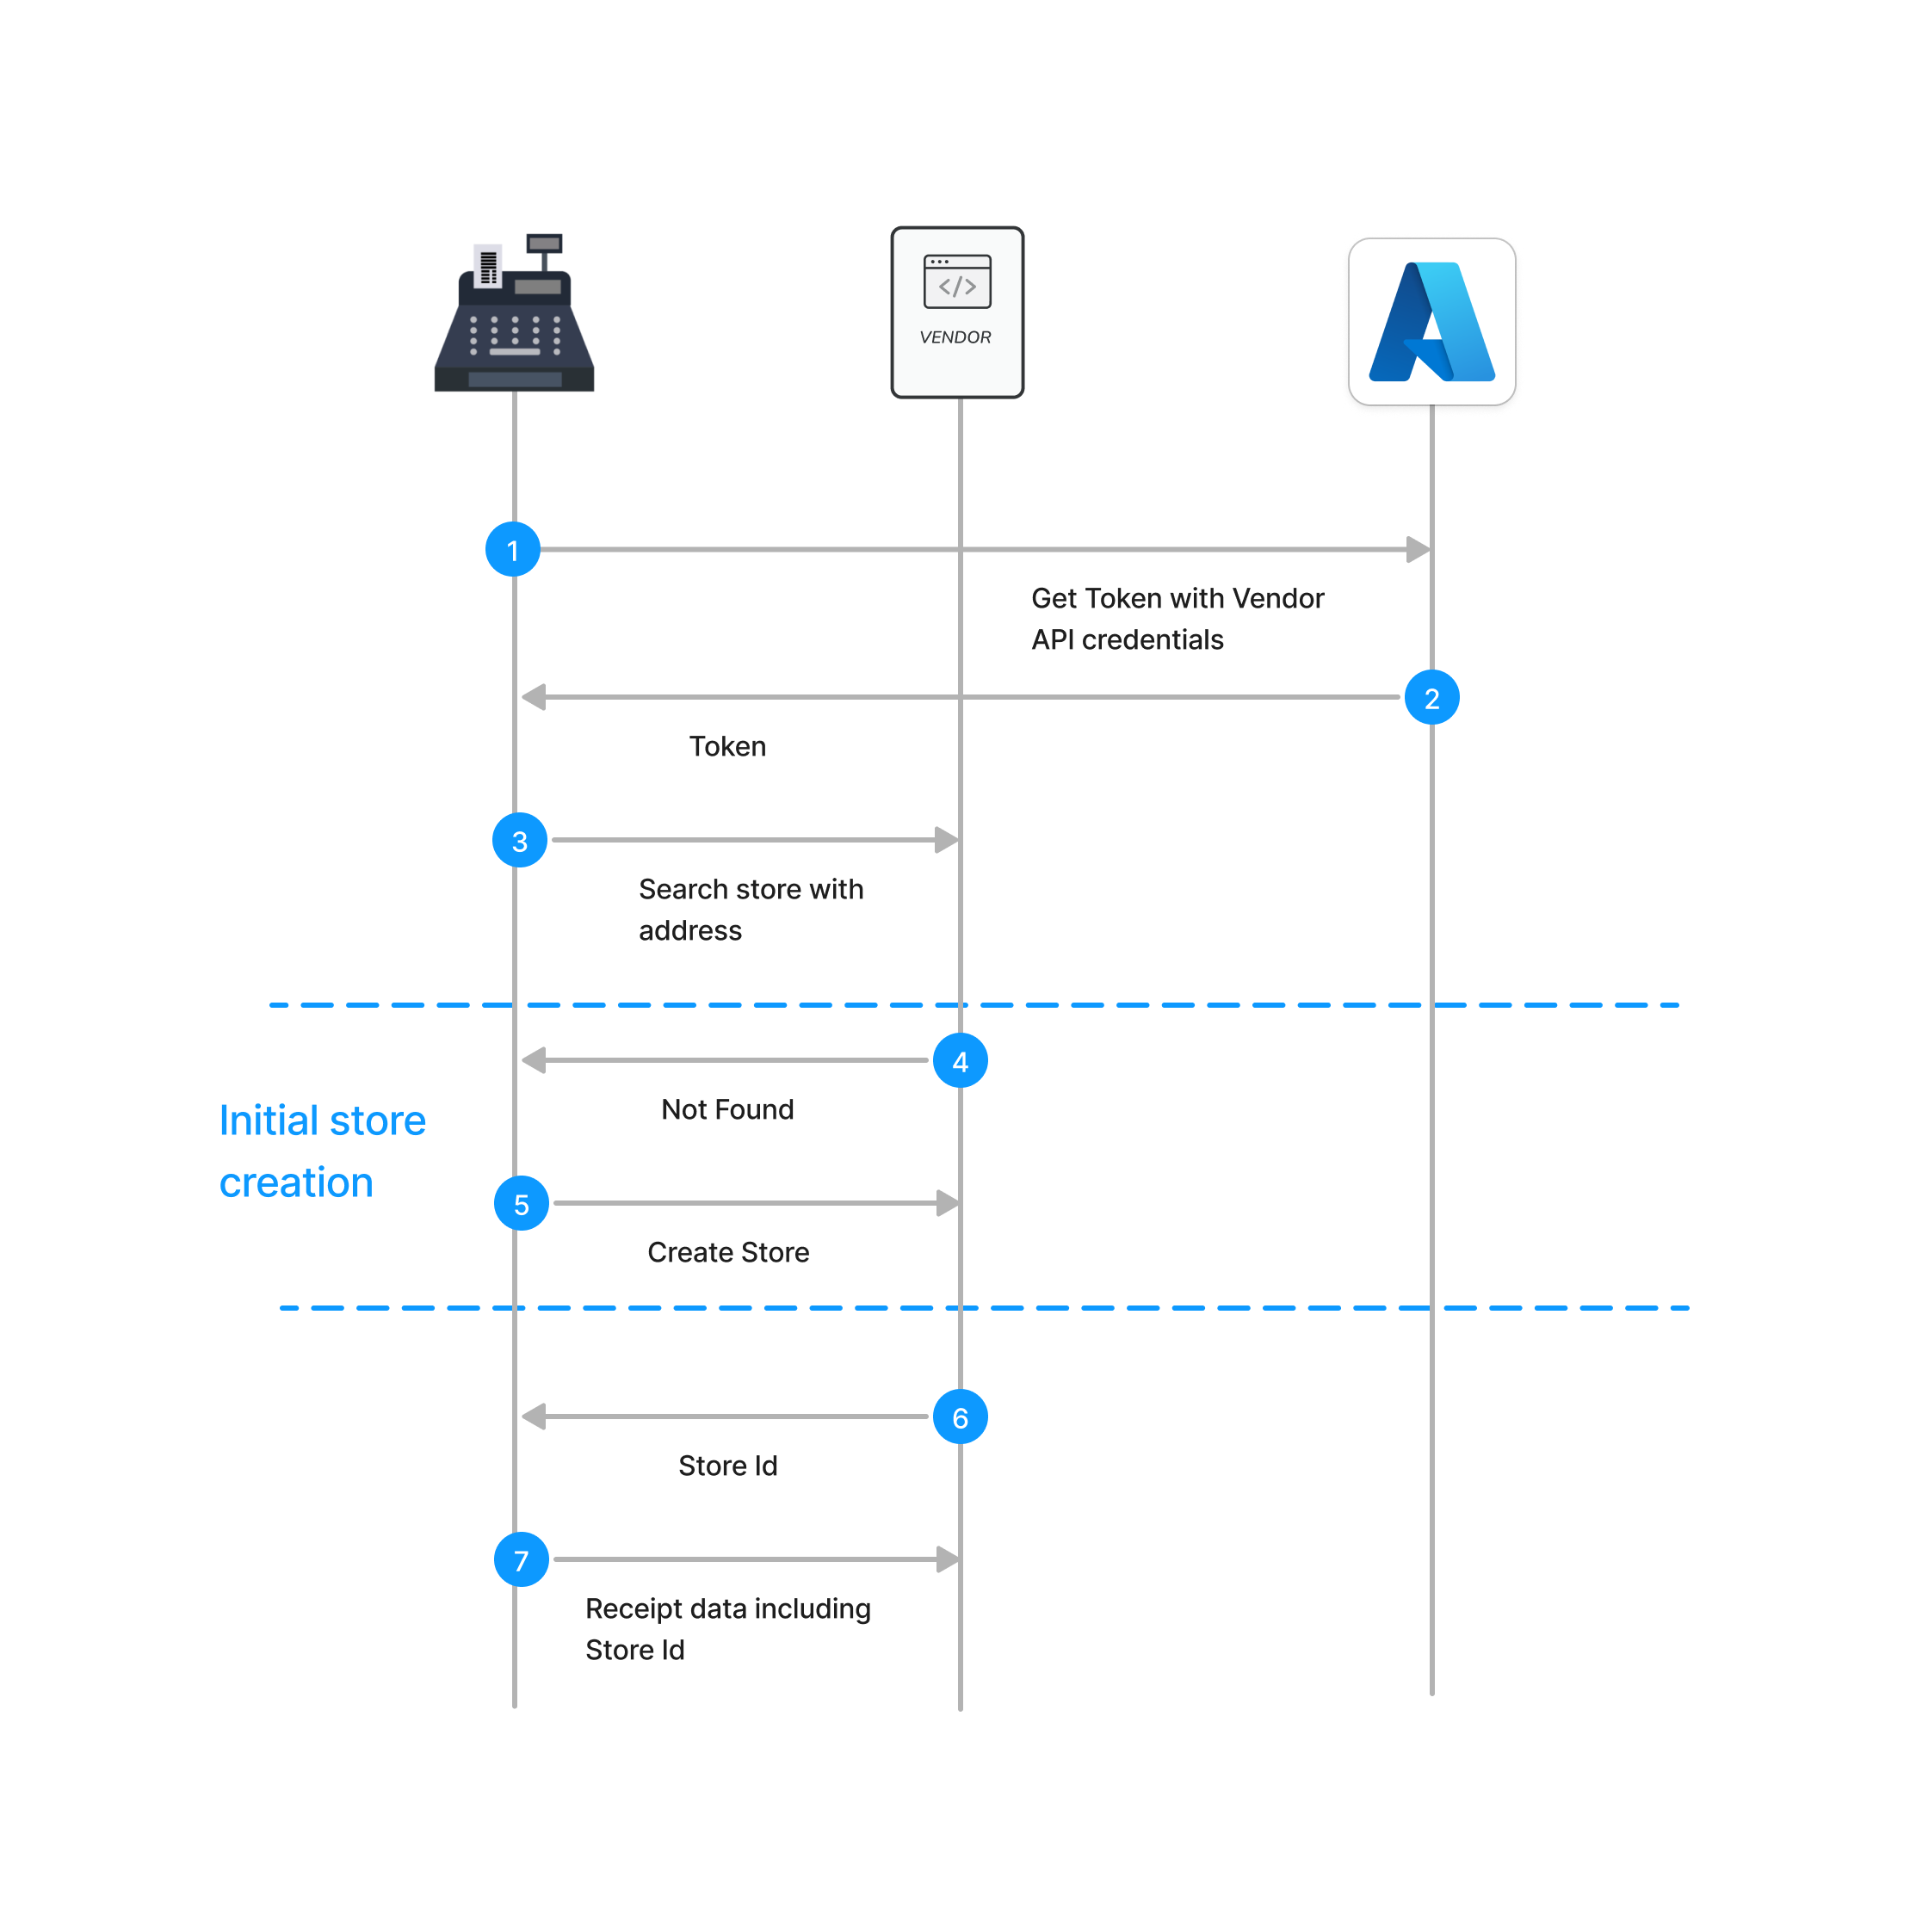
# Create Store
To automate the onboarding process of a merchant, anybill provides an endpoint to onboard and activate stores for digital receipts. This operation creates stores at anybill and assigns a unique Store ID. Additionally, this interface replaces the manual entry of stores in the Anybill portal. It can also be utilized in special cases, such as when store IDs cannot be manually entered into the cash register (e.g., due to a lack of a feedback channel to the cash register).
POST /v3/store
Request Body:
{
  "id": "string",
  "displayName": "string",
  "legalName": "string",
  "address": {
    "countryCode": "string, ISO 3166-1 alpha-3",
    "zip": "string",
    "city": "string",
    "street": "string",
    "number": "string"
  },
  "vatId": "string",
  "language": "string, ISO 639-1"
}
# Search store by address
Additionally, it can occur that cash registers in a shop cannot communicate with each other, and thus, calling the Create Store Endpoint might create duplicates. For this scenario, anybill provides the Search Store Endpoint, allowing you to check in advance whether a store already exists for the address integrated into the cash register. If no store exists, you need to create a store using the Create Store Endpoint. If a store already exists, the Store ID is returned, which should then be used in the receipt data for creating digital receipts.
# Loyalty Endpoints
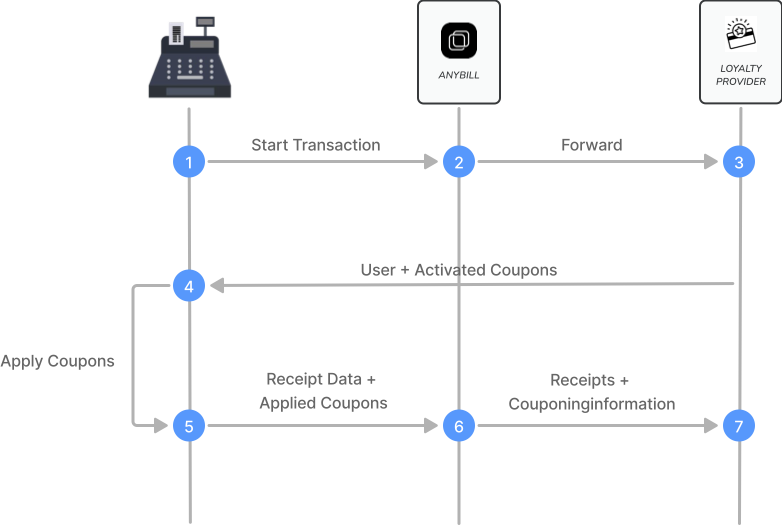
# Overview
anybill can act as a connector between POS systems and loyalty providers.
When a customer scans their loyalty card or QR code at the POS, transaction data - including loyalty information — can be transmitted through anybill to the corresponding loyalty provider.
# How It Works
The loyalty integration extends the standard receipt submission with optional loyalty data.
When processing a transaction with loyalty participation:
- A transaction starts at the POS (e.g., QR code or customer card scanned).
- anybill transmits receipt and couponing information to the loyalty provider.
- The loyalty provider applies coupons and rewards.
- User and activated coupon data are returned.
- The final enriched receipt data is processed.
- A webhook is triggered and delivered to your system.
# Starting a Loyalty Transaction
A loyalty transaction can be initiated via one of our loyalty endpoints.
When a user identifier (QR code, physical card, etc.) is scanned, you can use our loyalty endpoint to fetch activated coupons, collected points, or transaction IDs - depending on your loyalty partner.
Example Request:
PUT /v3/loyalty/helloagain/transactions
{
  "customerId": "1332423432"
}
Example Response:
{
  "transactionId": "123",
  "customerId": "1332423432",
  "activatedRewards": [
    {
      "customIdentifier": "23432432"
    }
  ],
  "customFields": {}
}
# Integration with Bill Endpoint
Loyalty transactions are submitted using the standard POST /v3/bill endpoint, with the following key components:
# User Identification
Use the userIdentification object to link the receipt to a loyalty member:
- externalId – external customer system ID
# Loyalty Payment Details
Include loyalty information (such as points, redeemed coupons, etc.) using the couponingInformation field inside the extension:anybill object.
Example:
{
  "extension:anybill": {
    "couponingInformation": {
      "type": "LoyaltyProviderType",
      "redeemedRewards": [
        {
          "identifier": "123456"
        }
      ],
      "transactionId": "12345"
    }
  }
}
# Configuration
Loyalty integrations require configuration on the anybill side to connect with your specific loyalty provider.
Please contact anybill to:
- Set up your loyalty provider connection
- Configure the data format required by your loyalty system
- Enable loyalty webhooks for transaction notifications
💡 Tip:
The loyalty data structure is flexible and can be customized to match your loyalty provider’s requirements - including custom fields for transaction IDs, reward metadata, or program-specific attributes.
# Postman
A postman collection can be found here.
To acquire an access_token first set your credentials for the following collection variables:
- username
- password
- client_id
After your credentials are set, send a request with the GetToken request. The acquired access token will be set automatically for all requests in the collection. Choose the environment and you are good to go.
If you want to switch between staging and production environment, you have to change the base path from https://vendor.stg.anybill.de (opens new window) to https://vendor.anybill.de (opens new window).
# License
The anybill vendor API v3 data model builds upon the DFKA e.V. EKaBS-Json-Scheme. This scheme is licenced under the Creative Commons Licence CC BY-SA 4.0.
This results in the following rights for the user: The EKaBS-JSON schema and the documentation may be reproduced, redistributed, modified and used in any form as long as the reference to the DFKA e.V. as licensor is kept and modifications are only passed on under the same conditions.