# Web Integration
# General Information
Getting Started
Error handling
# Usage
Usage
TIP
The anybill web SDK is based on async/await syntax (opens new window). Although it is technically possible to use Promise based syntax we recommend the async/await syntax in conjunction with try/catch.
Breaking Changes in base module 1.0.0 - Migration Guide
With the release of our base module, which contains the logic that was split between our older modules, several changes have been introduced that require adjustments on your side. This migration guide is designed to help you transition smoothly and understand the key changes. Click here for more information...
# 1. Initializing
The initialization of the anybill SDK has moved from the loginTokenUser method to ApiConfig.initialize(clientId, environment). For a more detailed description refer to this section.
# 2. Renaming
We have standardized our terminology by migrating to the correct naming of our product. All "Bill" references have been renamed to "Receipt":
BillDto→ReceiptDto:
All subtypes of "Bill" have been removed and replaced with a unifiedReceiptDto. This means you no longer need to handle multiple types.BillProvider→ReceiptProvider:
TheReceiptProvidernow consolidates all methods previously found inBillProvider.
# 3. Receipt Model Changes
- The receipt model has been streamlined to include only frontend-relevant parameters.
- The
isFavouriteflag has been relocated toReceipt.Misc.isFavouritefor better categorization.
# 4. Receipt Method Renaming
The renaming of classes and models has also impacted the method names in the ReceiptProvider. Below are the most relevant changes:
LiveData Updates:
billsLiveData →receiptsLiveData
Method Renames:
getBillPDFasFile→getReceiptPDFasFilegetBillPDFasBlob→getReceiptPDFasBlobupdateBillComment→updateReceiptNoteupdateIsFavourite→toggleIsFavourite
Receipt Retrieval Updates:
- Methods such as
getBills,updateBills, and similar have been replaced with a new, optimized receipt retrieval process (details below).
- Methods such as
# 5. Receipt Retrieval Overhaul
We’ve introduced a significantly improved pagination and caching system designed to handle a larger volume of receipts efficiently.
- Refer to this Guide for implementing the new optimized receipt retrieval process.
# Support
If you encounter any issues during the migration process, don’t hesitate to reach out to us. We're here to help!
# Getting Started
# Resolving the SDK
The anybill SDK for web is hosted in a private npm registry (anybill-npm) that has also access to the public npm registry. This means there is no need to install peer dependecies as they get resolved in the registry itself.
That said here is how to resolve the SDK with scoped access from the anybill-npm registry:
Retrieve an <AUTH_TOKEN> from jfrog. Login to jfrog (opens new window). Navigate to Artifacts -> Select the desired artifact and click on "Set me up". Enter your password and copy the <AUTH_TOKEN>
Add a
.npmrcfile to the root directory of your project containing the following:
//anybill.jfrog.io/artifactory/api/npm/anybill_web_sdk/:_authToken = <AUTH_TOKEN>
email = youremail@email.com
always-auth = true
@anybill:registry = https://anybill.jfrog.io/artifactory/api/npm/anybill_web_sdk/
SECRET
This file should not be checked into version control!
- Now you can install modules via:
npm:
npm install @anybill/base
yarn:
yarn add @anybill/base
# Error handling
The anybill web SDK aims to provider the developer with easily understandable and catchable errors. The following two paragraphs introduce the used error model and how to work with it.
# Error object
The error object is based on the internal Error object (opens new window). It has the following structure:
class AnybillError extends Error {
    status: number;
    timestamp: string;
    path?: string;
    details?: any;
}

/// Example error handling
async function getQRData() {
  try {
    const res = await AuthProvider.instance.getQRCodeData();
    /// Present qr code to user
  } catch (ex) {
    const error = ex as AnybillError;
    switch (error.status) {
      case 400:
        /// handle bad request error
        break;
      case 401:
        /// refetch credentials
        break;
      case 500:
        /// handle server error
        break;
    }
  }
}
All errors thrown by the Anybill SDK methods are of type AnybillError, making them easily parsable. The simplest way to handle specific errors is by checking the status property, which reflects the API response code or 0 if the error occurs before a request is sent. For additional context on the error, refer to the details parameter.
# Usage
# Initialization
To initialize the SDK with your clientId you must call the initialize method from the ApiConfig class. Furthermore this method allows you to change the api environment for testing puposes.
import { ApiConfig } from "@anybill/base";

  ApiConfig.initialize(
      "your-client_id",
      ApiEnvironment.TEST_API_URL
    );
# Authentication
To authenticate the anybill SDK you can link an anybill user to your user account by using the linked token user. For detailed instructions, refer to the Partner Platform API documentation.
- Get a token from the anybill Partner API by linking you account system to an anybill id.
- Login with the anybill sdk
import { AuthProvider } from "@anybill/base";

try {
  await AuthProvider.instance.loginTokenUser(accessToken, refreshToken);
}  catch (ex) {
    const error = ex as AnybillError;
    switch (error.status) {
      case 400:
        /// handle bad request error
        break;
      case 401:
        /// refetch credentials
        break;
      case 500:
        /// handle server error
        break;
    }
}
TIP
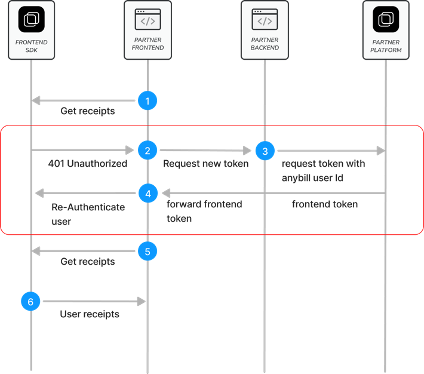
When using the Token Based Login you'll have to check for a failing Refresh Token Call on the first anybill API Call you invoke by catching a 401 error. When the error is triggered you'll have to retrieve new authentication information from the anybill Partner Platform API.
# Getting user information
After logging in an anybill user with the received token, user information can be acquired using following methods:
import { AuthProvider } from "@anybill/auth";

// User Model including id (anybill Id), externalId (usually your id) and more
const user = await AuthProvider.instance.getUserData();

// Data object which can be displayed as QR Code to receive receipts by scanning of the users device
const userQRCodeData = await AuthProvider.instance.getQRCodeData();
# Retrieving receipts
The anybill SDK offers two distinct approaches for fetching user receipts:
Direct API Access: Use the
ReceiptProvider.getReceipts()method to directly access the API. This approach allows you to implement custom fetching and pagination logic based on your specific requirements.Optimized SDK Caching Process: Leverage the SDK's built-in caching and optimized pagination for efficient receipt retrieval by using the
initiateReceiptQuery()andcontinueReceiptQuery()methods. This approach simplifies the retrieval process and reduces the need for manual pagination handling.
Detailed information about both approaches is provided below:
Direct API Access
The getReceipts() method allows you to retrieve user receipts with pagination support. The result includes the receipts, the total count of available receipts, and a continuation token that can be used to fetch subsequent batches.
You can customize the request with the following parameters:
take: Specifies the number of receipts to fetch in each batch. The default and maximum value is 100.
continuationToken: A nullable token used for paginating through the query results. If
null, a new query is initiated. To continue fetching from the previous result, use thecontinuationTokenprovided in the last response.orderBy: Specifies the field used for ordering the receipts. Currently, only
Dateis available.orderDirection: Defines the sort direction for the receipts, either
AscendingorDescending.
TIP
Important:
Due to database restrictions, you must specify the orderBy and orderDirection parameters for every page of the query.
Also, remember to reset the continuationToken if you modify any query parameters.
   try {
    const continuationList = await ReceiptProvider.instance.getReceipts({
      take: 100,
      orderBy: UserReceiptOrderByFieldDto.Date,
      orderDirection: OrderByDirectionDto.Descending,
    });
    /// handle receipts: continuationList.receipts
    /// save continuation token to fetch the next batch of receitps: continuationList.continuationToken;
  } catch (ex) {
    /// handle error
  }
Optimized SDK Caching Process
The anybill SDK offers an optimized receipt pagination process, providing efficient querying and display of receipts.
Similar to direct API access, you can customize the query with the following parameters:
- take: Specifies the number of receipts to retrieve in each batch, with a maximum of 100 by default.
- orderBy: Specifies the field for ordering receipts. Currently, only
Dateis supported. - orderDirection: Defines the sort direction for receipts, either
AscendingorDescending.
TIP
Note on Pagination and Sorting
The continuation token and query management are handled internally by the SDK, so there is no need for manual handling to load additional pages.
If you wish to change the sorting or direction of the receipt list, use the initiateReceiptQuery() method again.
Fetch first page / Update receipt list
The initiateReceiptQuery method resets any existing query. We recommend calling this method in the following scenarios to ensure an up-to-date receipt list:
Initial Display of Receipt List
When the receipt list is displayed for the first time in a session (e.g., when the user navigates to the receipt list view), this method should be called to display the latest receipt data.New Receipt Received
If a new receipt is issued while the user is in the app, the list should be refreshed upon notification of the new receipt (e.g., triggered by a webhook event). This ensures the receipt list reflects the latest transactions.Manual User Update
For scenarios where a user manually refreshes the list, such as through a "pull-to-refresh" gesture or a refresh button, use this method to re-fetch the latest data for the first page.Change in Sort Order
When changing the sorting parameters of the receipt list (e.g., switching the sort order), call this method with the new parameters. This will reset the cache to reflect the updated sorting criteria.
   try {
    const continuationList = await ReceiptProvider.instance.initiateReceiptQuery({
      take: 100,
      orderBy: UserReceiptOrderByFieldDto.Date,
      orderDirection: OrderByDirectionDto.Descending,
    });
    /// handle receipts: continuationList.receipts
  } catch (ex) {
    /// handle error
  }
Fetch next page
To retrieve the next batch of receipts in the existing query, use continueReceiptQuery(). This method automatically applies the previously retrieved continuation token to fetch the subsequent set of receipts.
   try {
    const continuationList = await ReceiptProvider.instance.continueReceiptQuery();
    /// handle receipts: continuationList.receipts
  } catch (ex) {
    /// handle error
  }
Querying for single receipts by id can be achieved with the getReceiptByID method of the ReceiptProvider
import { ReceiptsProvider } from "@anybill/base";

const singleReceipt = await ReceiptProvider.instance
    .getReceiptByID("receipt-id");
# Downloading user receipts
The Receipt utility has different methods of providing a PDF version of a receipt.
Following three functions are available and should be used according to your project setup:
import { ReceiptProvider } from "@anybill/base";

// best for client side use
const objectURL = await ReceiptProvider.instance
    .getReceiptPDFasObjectURL(receiptId);

// flexible usage
const blob = await ReceiptProvider.instance
    .getReceiptPDFasBlob(receiptId);

// best for server side use
const file = await ReceiptProvider.instance
    .getReceiptPDFasFile(receiptId);
ObjectURL memory
ObjectURLs generated with getReceiptPDFasObjectURL are not automagically revoked!
To do so use URL.revokeObjectURL (opens new window) after using the URL.
File name
The File returned by getReceiptPDFasFile has a name with template:
`receipt-export_${new Date().toLocaleDateString()}.pdf`
# Deleting users receipts
Using the ReceiptProvider utility you can delete either a single receipt or multiple receipts at once by calling following methods with the corresponding receiptIds.
import { ReceiptProvider } from "@anybill/base";

// Delete a single receipt
await ReceiptProvider.instance.deleteReceipt(receiptId);

// Delete multiple receipts at once
await ReceiptProvider.instance.deleteReceipts([receiptId1, receiptId2]);
# Mark a receipt as favourite
User receipts can be marked as favourite using following function:
import { ReceiptProvider } from "@anybill/base";

// Toggle  isFavourite flag
await ReceiptProvider.instance.toggleIsFavourite(receiptId);
Receipt Model
Boolean value ReceiptDto.misc.isFavourite determines whether a receipt is marked as favourite.
# Update receipt note
Using the ReceiptProvider.updateReceiptNote() method, a custom note can be set for a receipt which can be retrieved in the ReceiptDto.Misc.Note field.
This field can later on be used for querying and filtering the receipt list.
import { ReceiptProvider } from "@anybill/base";

// Update note flag
await ReceiptProvider.instance.updateReceiptNote(
      receiptId,
      note
    );
# Add receipt
To add a new receipt to the authenticated user account, implement the ReceiptProvider.addReceiptByID(receiptID: string, isSelfGenerated: boolean = false, vendorCustomerID: string | null = null) method.
Make sure to update the receipt list, once a new user receipt is added.
import { ReceiptProvider } from "@anybill/base";

// Update note flag
await ReceiptProvider.instance.addReceiptByID(
      receiptId,
      isSelfGenerated,
      vendorCustomerID
    );
# Filtering receipt list
The anybill SDK delivers receipts as structured data, enabling you to filter by any receipt field seamlessly. This allows you to display all relevant results dynamically, without the need to explicitly initiate API calls with query parameters.
Common use cases include filtering the receipt list for favorites or searching for specific string values.
For an easy query of the receipt list the anybill SDK provides an function called searchReceipts(receipts: ReceiptDto[], search: string). The method filters store name, address, amount, note, and line and discount descriptions. As this method is highly performance costing, we do recommend checking for a min length of the keyword (e.g. > 3) before executing.
Example implementation of allowing to simultaneously query for a string value
    // Unfiltered receipts
    let receipts: ReceiptDto[] = [];

    // Filtered receipts
    let filteredReceipts: ReceiptDto[] = [];

    // Function that is called if the search term changes
    function onSearchTermChanged(searchTerm: string) {
      if (searchTerm.length <= 3) {
        filteredReceipts = receipts;
        return;
      }

      filteredReceipts = searchReceipts(receipts, searchTerm);
    }
# Fuzzy Receipt Search
💲 Premium Feature
The Fuzzy Receipt Search is a premium feature that needs to be explicitly activated for merchants. Please contact support@anybill.de to talk about details.
While the searchReceipts(receipts, search) function (see Filtering receipt list) performs a local, in-memory match across the receipts currently held in the cache, the anybill SDK additionally provides a server-side Fuzzy Receipt Search. Instead of relying on exact string matches, the backend evaluates the similarity between the search query and the indexed receipt content. This includes the line item descriptions as well as additional keywords that anybill enriches each receipt with (e.g. brand names, product categories, or common synonyms). As a result, users can find relevant receipts even when their query does not exactly match the text printed on the receipt, for example due to typos, abbreviations, or alternative product wording.
Because the search runs against the full receipt index on the backend, it is not limited to the receipts already loaded into the local cache. This makes it well suited as the primary search experience for users with a large receipt history.
TIP
The Fuzzy Receipt Search is the recommended approach for advanced, full-history search and complements the local searchReceipts(receipts, search) function, which remains available for lightweight filtering of the already cached receipt list. Note that the server-side search is a method on the ReceiptProvider (ReceiptProvider.instance.searchReceipts(query)), whereas the local filter is a standalone helper function (searchReceipts(receipts, search)).
# Performing a search
To run a fuzzy search, use the ReceiptProvider.searchReceipts() method:
async searchReceipts(
    query: string,
    page?: number,
    limit?: number,
    minSimilarity?: number
): Promise<Receipt[]>
Parameters:
query:
The search term entered by the user.
page:
Optional page index used for pagination. If undefined, the first page is returned.
limit:
Optional number of receipts to return per page. If undefined, the default page size is applied.
minSimilarity:
Optional threshold (range 0.0 to 1.0) controlling how closely a receipt must match the query to be included in the result. Lower values return more but less precise results, while higher values restrict the result set to closer matches. If undefined, the backend default is applied.
Accessing the returned receipts works equivalently to the standard receipt retrieval described in Retrieving receipts: the call resolves directly to a Receipt[] array. On success, the matched receipts are returned directly; errors are thrown as an AnybillError and should be handled via try/catch.
# The searchMatches field
The key difference between a searched receipt and a regularly retrieved one is the additional searchMatches field on the returned Receipt objects. searchMatches contains the list of product names that triggered a match.
This information can be used in your frontend to highlight the matching products on the displayed receipt, helping users immediately understand why a given receipt was returned. This is particularly useful in web integrations or in any context where the receipt is rendered as structured data rather than displayed as a PDF.
import { ReceiptProvider } from "@anybill/base";

async function searchReceipts(query: string) {
  try {
    const receipts = await ReceiptProvider.instance.searchReceipts(query);
    receipts.forEach((receipt) => {
      // receipt.searchMatches contains the matched product names.
      // Use these to highlight the relevant line items in your UI.
    });
  } catch (ex) {
    const error = ex as AnybillError;
    switch (error.status) {
      case 400:
        /// handle bad request error
        break;
      case 401:
        /// refetch credentials
        break;
      case 500:
        /// handle server error
        break;
    }
  }
}